Portal

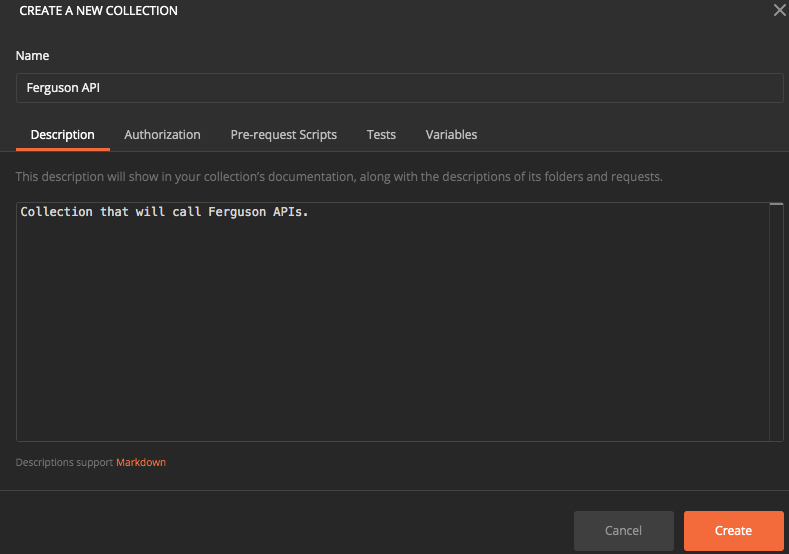
Oauth 2 Client Credentials Overview

Keywords


Welcome to Ferguson’s Developer Portal!


Introduction

In this blog post we are going to go over OAuth 2.0 Authorization Framework, delve into the easiest Authorization Grant called Client Credentials, and give some useful information about how it works.

Quick explanation of OAuth 2.0

When trying to explain to someone what OAuth 2.0 is, I always think of the phrase “Access Delegation”. It’s a means by which you, the end user or resource owner, can get a token and then share or give that token to a client to access resources on your behalf without giving that client your password. I think Wikipedia’s first paragraph sums up OAuth nicely:

“OAuth is an open standard for access delegation, commonly used as a way for Internet users to grant websites or applications access to their information on other websites but without giving them the passwords.”

OAuth 2.0 Roles

You can’t talk about delegating access without understanding who is giving access to what. OAuth refers to these as “Roles” and here they are shortened for brevity:

  • Resource Owner: The entity who is granting access to a protected resource.
  • Resource Server: The thing that is protected and takes access tokens. In our case, the REST API.
  • Client: The application you don’t want to give your password too but needs to access the Resource Server.
  • Authorization Server: The server that issues an access token once you have authenticated successfully as the Resource Owner.

OAuth 2.0 Grant types

When working with OAuth 2.0 “Access Delegation” patterns, you will commonly hear them being referenced as “Grants” as you’re “Granting” access or “Authorizing” a client which you’d rather not give your password too. You will also hear grants referenced as “Authorization Grants”.

The OAuth 2.0 SPEC defines 4 unique Grant Types which are called:

  • Client Credentials
  • Resource Owner Password Credentials (ROPC or Password Grant Type)
  • Implicit
  • Authorization Code

Each one of these fits a specific use case and if you’re curious which OAuth 2.0 Grant Type should be used for your particular situation, take a look at Alex Bilbie’s website as he’s got a snazzy decision workflow diagram towards the bottom of the page. We will eventually cover all of these OAuth2 grants here on our blog.

Client Credentials

The first grant type we’re going to discuss is Client Credentials. Client Credentials is only used in situations where you are talking between machines or backend service accounts who don’t use an interactive session. Because of this, Client Credentials grant type is one of the easiest grant types to understand as there’s not much to it. You can break it down to two steps really.

  1. First step is getting an access token by giving the Authorization Server proof that it is really you and when your token expires, say in one hour, getting another one.
  2. Second step is taking that access token and giving it to the Resource Server when you need something like making an API call.

And that is pretty much it. Because this grant type is used by machine accounts, it does not get a refresh token just an access token.

Getting an access token from Ferguson

The first step to making an API call to Ferguson is to get an access token but before that, you will need to be registered with our Developer Portal, have created a Developer App, and gotten your Credentials.

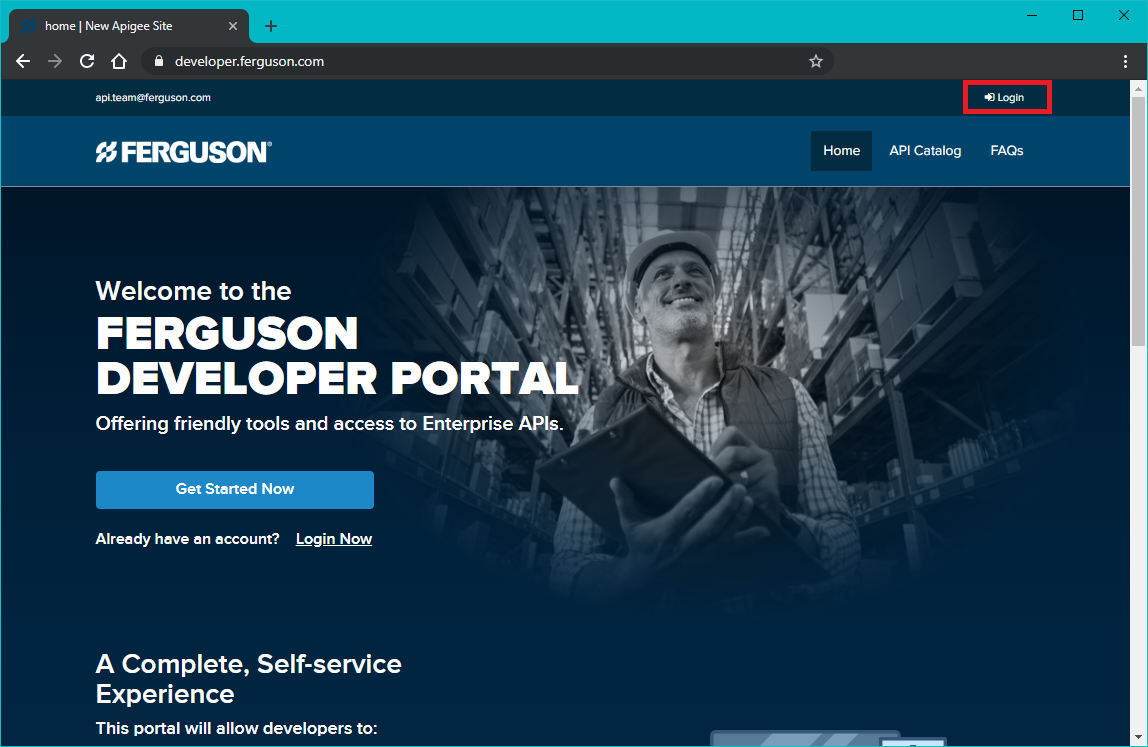
The login link is in the upper righthand corner of the page.


Once logged in, go to your “My Apps” page and select the button to the far right called “Register New App”.

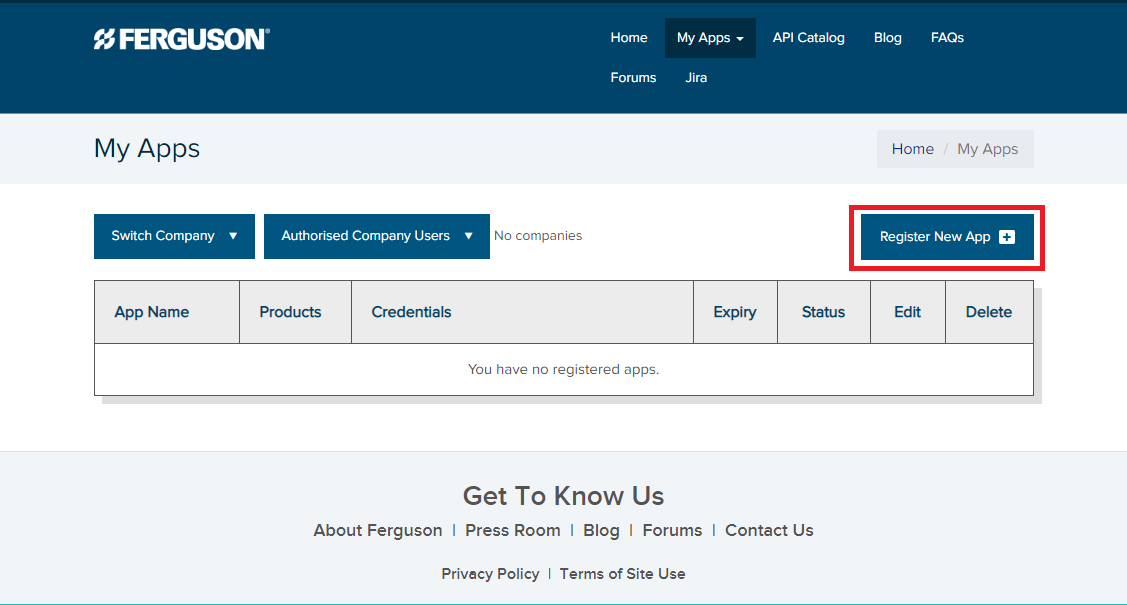
The “Register New App” located on the right of the picture above and outlined in RED.

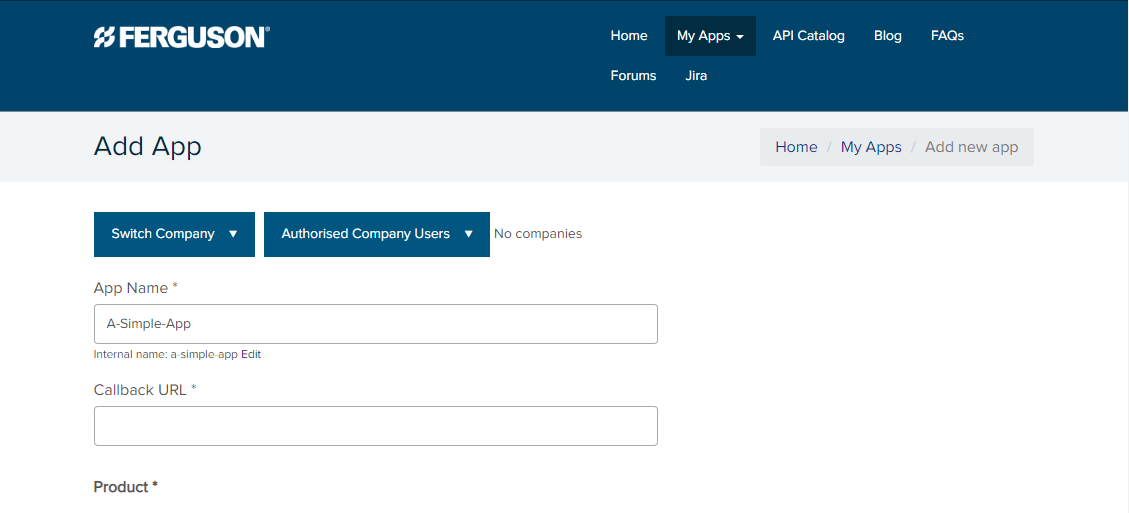
Now you need to come up with an App name and select the API Product that is right for you. For the purposes of this blog post, I am going to use the “HelloWorld” Product.

Once you’re all filled out, then click the “Create App” button at the bottom of the page.


Now you will have an App Key and App Secret which get exchanged for an access token and allow access specifically to the HelloWorld API Product that we selected earlier.

Here you can see my Key = FqCHNSblIS9Agf7JLpn2KGBLOVLBwJUi and my Secret = rx2KpqAjpT8NB7yt


  NOTE: We’re going to go over in detail the Client Credentials Grant Flow but your software code shouldn’t be doing this by hand! Make sure to hit the internet to find an OAuth2 library for your specific application. OAuth.net has a nice listing of OAuth2 libraries per language.


UML Sequence diagram of Client Credentials Grant Flow

Let’s look at this flow using an UML sequence diagram to understand how Ferguson exchanges credentials (Key & Secret) for fetching an access token. While Ferguson is using the preferred method of HTTP Basic authentication there are other ways of authenticating to get an access token such as client_id and client_secret in the request-body but they all need to be encoded using a Content-Type of “application/x-www-form-urlencoded”.

OAuth2 client credentials sequence diagram


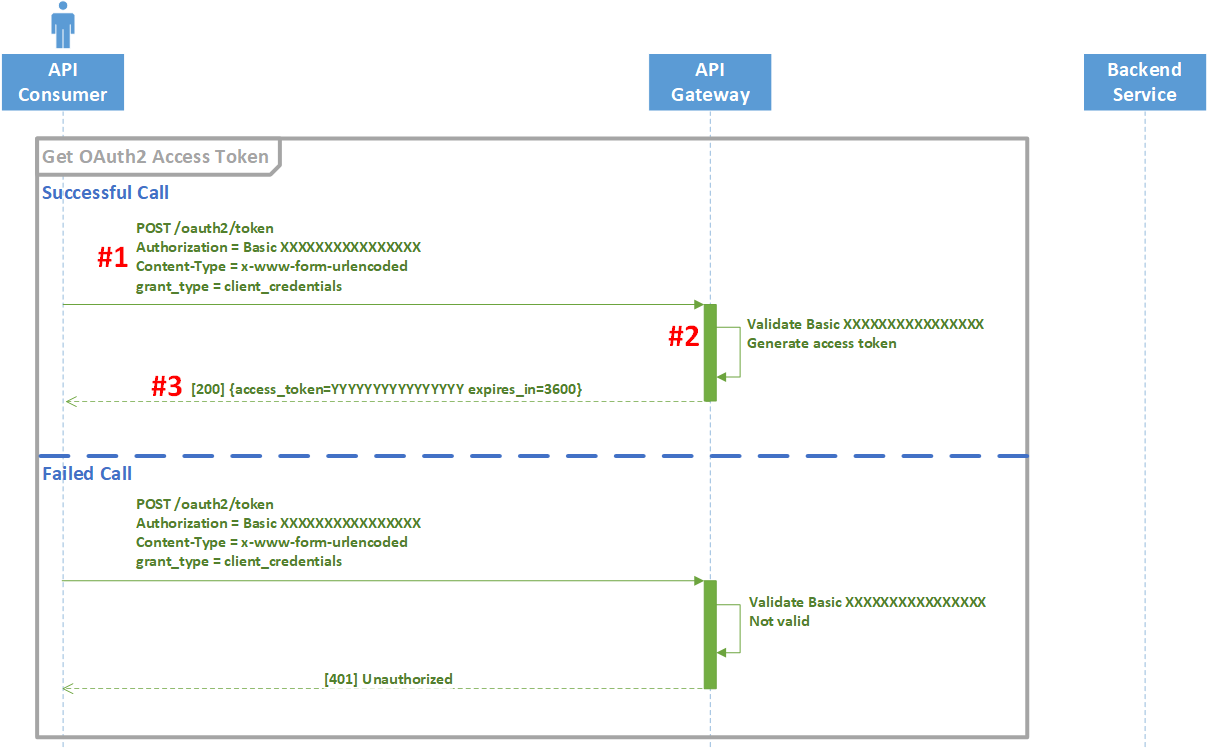
  1. We are going to make an API call to the OAuth2 token endpoint using our credentials from the developer portal in the form of a Basic authentication header that’s base64 encoded with padding.
    1. Take our Key & Secret and base64 encode them like so:

      base64 encode with padding (<KEY> + “:” + <SECRET>)
      FqCHNSblIS9Agf7JLpn2KGBLOVLBwJUi: rx2KpqAjpT8NB7yt

      Which becomes: RnFDSE5TYmxJUzlBZ2Y3SkxwbjJLR0JMT1ZMQndKVWk6cngyS3BxQWpwVDhOQjd5dA==
       
    2. Now, take the base64 encoded value and use it as a Basic Authorization HTTP request header, set our Content-Type and add a form parameter of grant_type=client_credentials.
    3. If you are following along and using curl, your request might look like this:
      curl -X POST \ https://sandboxapi2.ferguson.com/oauth2/token \
       -H 'Authorization: Basic RnFDSE5TYmxJUzlBZ2Y3SkxwbjJLR0JMT1ZMQndKVWk6cngyS3BxQWpwVDhOQjd5dA==' \
       -H 'Content-Type: application/x-www-form-urlencoded' \
       -d 'grant_type=client_credentials'
      
  2. Once your API call hits the API Gateway, it decodes your Basic Authorization header and makes sure your creds are still valid and enabled.
  3. If your credentials are still valid, it issues a JSON payload back to you with an access token and expires_in key/value pair. Typically access tokens expire after an hour and this is why it is critical that you use a library to manage your OAuth2 credentials. If your credentials weren’t valid, you’d get back a 401 Unauthorized response.

Using your access token to make a “HelloWorld” REST API call

Now that we have explained the entire flow of how you get an access token using Client Credentials Grant Type, let’s use it to call our API!

REST API call through API gateway to backend service.


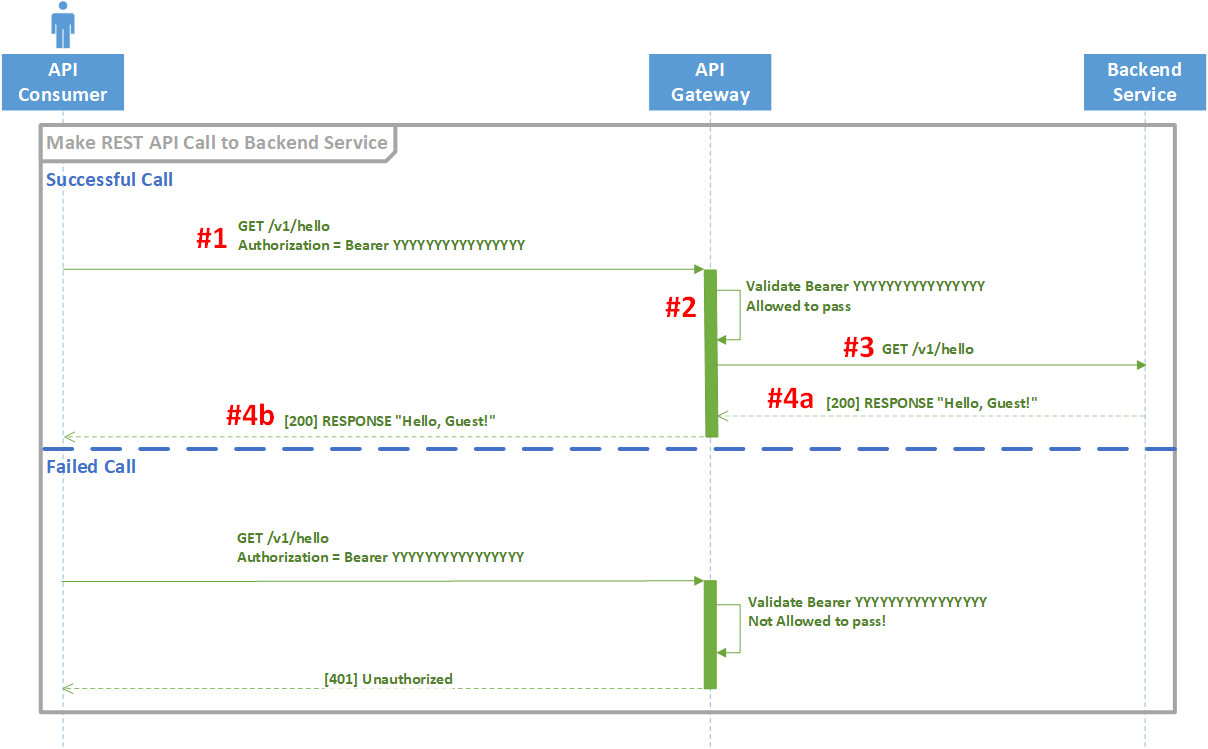
Just like getting the access token, we have divided the REST API call into multiple steps.

  1. We are going to craft our request payload with just an Authorization header that’s set using our access token and our token type of “Bearer”. There are a number of types of tokens but the OAuth2 RFC6750 specifically created a Bearer Token Usage document which defines the proper usage of Bearer tokens within the OAuth2 Authorization Framework. There are other types of Bearer tokens like JSON Web Tokens (JWTs) and OpenID Connect (OIDC) but we won’t get into those types of Bearer tokens in this blog post.

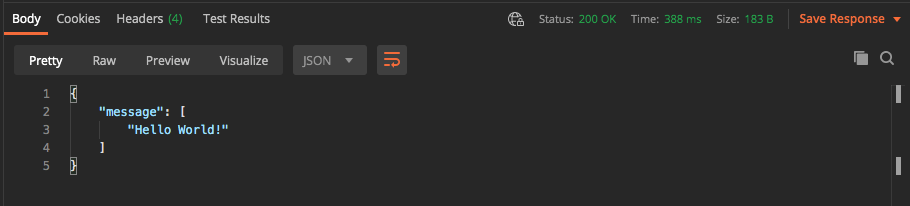
    Our curl command would look like the following:
    curl -H 'Authorization: Bearer Fogs1kEE7lvoTGUkX7q55v3wfQBt' \
     https://sandboxapi2.ferguson.com/v1/hello

    Once the HTTPS request hits Ferguson’s API Gateway, its’ Bearer token is verified. If it is not valid, the API Gateway throws back a 401 Unauthorized response.

  2.  Once the API Gateway has validated the Bearer token, it then checks other policies like quotas, spike arrests and IP address ACLs. If there had been any query string parameters or a request body, it would have done some level of validation on that too before finally sending it to the backend service’s API endpoint.
  3. The backend service responds:
    1. The backend service response initially hits Ferguson’s API Gateway where the gateway itself can do some level of validation or transformation on the backend’s response (maybe remove some response headers? Maybe change an XML response back to JSON?)
    2. Once the API Gateway is done with the response from the backend, it then forwards it to the API Consumer that made the initial API call.

Wrapping up OAuth2 Client Credentials Grant Type

While this might feel like a long blog post, we did cover a lot of information. We touched on OAuth2 being a framework for delegating authorization, the OAuth2 roles defined by the framework, and 4 authorization Grant Types with a super simple example of a Client Credentials grant with UML sequence diagrams and curl commands. We will go over the other 3 authorization Grant Types in future blog posts so stay tuned!

What is Postman?

Keywords

Introduction

Within the API Team at Ferguson, Postman has become an integral part of our API development pipeline. There is rarely a day that goes by where I don’t spend an hour or two utilizing the tool. So what exactly is Postman? It’s a software development and collaboration tool focused on API documentation, testing, and monitoring. There is a free version that you can download and start to use right now. The following guide will walk you through creating your first collection and request to hit the Ferguson Hello World endpoint.

Quickstart Guide

Pre-Requisites:

        -    Download and Install Postman

        -    Sign up for a free account

This guide will walk you through the steps needed to create your first Postman collection and request that will call our Hello World API. You can find the swagger for this API within our API Catalog.


Collection Creation 

  1.          When logging in for the first time, you will see that you don’t have any current collections. Click + New Collection or + Create a collection on the left side of the application                  window.


  1.         You will see the following popup box to be filled out. Let’s call this collection Ferguson API and add an appropriate description then click Create in the bottom right corner.


You will now see your newly created collection on the left hand side.


Request Creation

 We want to call the version 0 /hello endpoint of our Hello World API.

  1.                  Time to create our first request! Click on Add requests.


  1.                 Fill out the request information with appropriate name and description. Verify that the request is being saved to your newly created collection.  


                         Click Save to Ferguson API


  1.              Select your newly created request in your Ferguson API collection. The request will be blank besides the name so let’s fill in the appropriate information based on our                         Swagger.  


    The url and endpoint we want to hit is: https://uatapi2.ferguson.com/v0/hello

    Update your request URL to match.


  We can verify with the Swagger that this is a GET call that has no params or payloads.

  For more complicated requests you will see multiple tabs within the request where you can add on the appropriate authorization, query params, and payloads.


  1.           From here, we can Save and then Send the request!


  1.           You should see the below 200 OK response: 


This matches the swagger response, so we have successfully made our first Postman request.


Next Steps:

So what should you do now?

If you already have a Developer App for Ferguson APIs - verify that you have added our Hello World API and try making a call to the version 1 endpoint. If you don’t have a Developer App yet, please fill out our Contact Us form to get one created.


Hint: you will need to grab an OAuthv2 access token and add it to your authorization tab. If you have questions around how to do that, visit our earlier blog post OAuth 2 Client Credentials Overview.


API STRATEGY CONSIDERATIONS

Keywords

API STRATEGY CONSIDERATIONS

Having an API strategy that aligns with the overall goals of the business will help shape your development and ultimately achieve business goals.  An important early step in cultivating a successful API strategy is to define the goals of your API.  Remember, your goals should align with or enhance the overall business strategy.  Your goals may include creating new revenue streams, increasing internal efficiencies, and/or driving leads.  After defining the overarching goals of your API, you should decide what and how information should be shared between different applications, people, or business units. 


Questions to Ask

Some important questions that need to be answered during this stage are the “who, what, where, when, why and how":   

  • Who is using this API?  Is it mainly for internal use, partner companies, or for external developers, possibly all three?
  • What information can we provide?  Who will access that information?  How and how often are they allowed to access it?
  • What is the motivation, or the why, that drives the use of the API by developers, internal associates, and business partners?


Types of APIs

APIs can be classified in multiple ways.  At the highest level, there is private or internal APIs, and public APIs.

Private or Internal APIs

A common goal of creating a private API is to open connectivity between different applications/back-ends within or between organizations.  With an API these resources can be provided in a uniform and standardized way, giving the rest of the organization the ability to leverage these assets. This can increase development speed across an organization by allowing all teams to work independently in their own development cycles. Another positive aspect to fostering and developing a private API within your organization is the increased insight into whether a public API strategy is worth pursuing. 

Public APIs

A public API strategy can create new revenue streams and foster innovation. A public strategy will enable you to allow anyone to leverage and innovate on top of the APIs that you expose. It can allow you to pursue a “business to developer” or B2D business model. It is not a fit for every business, but in some cases, you can see great growth from a public API strategy. Some notable examples of companies with extremely successful public APIs are Facebook, Twitter, and Google.

APIs can further be subcategorized.  The major types we will discuss are browser, mobile, service to service, Internet of things (IoT), and self APIs.

            Browser APIs

Like a web API, a browser API is built into the web browser itself.  They can be referred to as BOM (Browser Object Model) APIs. If you have worked with front-end development, chances are you have worked with browser APIs already.  For example, the DOM (Document Object Model) is a browser API. Browser based APIs like the DOM help to solve front end development issues. Over time, most browsers have come to provide the same interfaces (like the DOM), which has increased browser cross-compatibility, but there are still cases where unique browsers will handle things differently. This is due to differences in the BOM provided by the browsers. As more browsers settle on a similar set of interfaces, ease of front-end development will increase. 

Mobile APIs

                The need for an API specific to a mobile application has become apparent as the amount of mobile applications and their use has skyrocketed in the last ten years.  When mobile applications had a smaller footprint, it was not necessary to build APIs specific to their use case; rather, they could rely on the same general APIs as the rest of an organization’s applications.  As mobile applications began to take up a larger slice of an organization’s traffic, organizations realized the benefits of developing APIs that cater specifically to mobile applications. Mobile application teams can take ownership of the APIs they leverage and move complicated business logic out of the application.

Service to Service

                Service to service APIs are designed with the thought that the main user is a service. These APIs can be used to link multiple services, or microservices together to create a larger application. Service based API development helps us to move away from monolithic application development. Developers can create small services that are focused on one function, while using APIs to tie them together, instead of adding functionality on top of an ever-growing monolith that becomes increasingly hard to maintain and improve. This can increase development speed and reduce complexity.

Internet of Things (IoT) APIs

                Similar benefits are realized when the Internet of Things (IoT) is given the ability to use APIs. A simple definition of IoT is, a network of physical objects that can connect and exchange data between each other over the internet.   APIs allow the IoT to securely transfer and share information throughout the network. APIs provide the interface between the internet and our devices and allow them to be part of the cloud. With an ever-increasing amount of IoT devices, IoT focused APIs are becoming more and more important. APIs give the IoT the ability to interact with the real world in real time, rather than just relying on a device’s physical location and sensors. IoT based APIs have opened a multitude of possibilities for the IoT and have helped to make the IoT a large part of our everyday life. 

Self APIs

                An API that makes itself understood through its usage is a “Self” API, short for self-descriptive.  A self-descriptive API has descriptive data responses, follows best practices, and leverages open standards where possible. This allows developers to jump right in and figure out what they need to do quickly by querying the API and following the instructions or using information in the responses. Following commonly accepted industry best practices and leveraging open standards also allows developers to use general knowledge when interacting with your APIs, rather than having to contact someone or refer to external documentation to use the service. Cutting down these communication barriers can be a huge boon to the development process and gives a better developer experience than the alternative.


Conclusion

APIs are sometimes referred to as the glue that holds the internet together, and in some ways they are. APIs are reusable, maintainable, scalable and they allow developers to innovate quickly and without being bogged down by the details of services they need to leverage. A well-thought-out API strategy will increase the speed of innovation, can bring about new ideas by removing barriers to change, and allow more people to have input on an organization’s success. Having a well-planned API strategy is extremely important for any company that is going to move into the modern API space.


Further Reading:

Web API overview and an explanation of Browser APIs

Differences in designing Private, Public and Partner APIs

Internet of Things Overview

Article on Building Self Descriptive APIs


Command Line Helper for APIs “cURL”

Keywords

Introduction

cURL is a command-line tool and it stands for client URL. In a terminal (Linux) or command prompt (windows) it is generally written as “curl”. cURL is majorly utilized in doing all sorts of URL manipulations and transferring data while making various network protocols.

#Provides a detail description and flags for the command-line tool curl

curl --man

cURL provides a wide variety of flags for understanding and troubleshooting network calls to any particular URL. Some of the majorly used flags:

-v:  verbose output which is an extremely useful option especially during troubleshooting/debugging in getting a detailed list of interaction between client and server. And, verbose can be done through layers. Flag -vv provides the second set of verbose which is way more detailed than -v.

--trace:  trace is an ultimate troubleshooting flag it provided every detail on what curl is sending and receiving through the request and response from the server

-o:  to save the output/stdout from curl to a file listed after the flag. -o flag is extensively used when a curl response from the server is a script that needs to be saved to a shell file in a local system.

-u:  Pass authentication details for ex:


-u “username:password”

or

-u “apikey:{key}”

As our interests lie more on curl driven REST API request to RESTful services, we would limit the protocol to HTTP/HTTPS. And to understand what REST API calls are, we need to get an idea on API.


What is an API?

API is an abbreviated form of “Application Programming Interface”.An API helps with seamless connectivity. API allows two applications to talk to each other and exchange data in a secure manner.

Some of the most common examples of an APIs are - Google Maps , Facebook, Twitter, YouTube, LinkedIn and so on.


How do you identify, it’s an API?

There are many types of APIs. Let's just try to categorize them for better understanding;

  1. Java APIs, or interfaces within classes that let objects talk to each other in the Java programming language
  2. Web APIs - SOAP, RPC and the most popular is the REST
  3. And thousands of public and private organizational based APIs are available in the market.

In this blog, we will touch on RESTful APIs which are very common and widely known across Application Developers. 


REST API

REST stands for “Representational State Transfer”. It is a set of rules and concepts that helps developers to model the application data as interrelated collections and objects. The resource representations in REST are self-descriptive. Fundamental operations on a REST API should be stateless, there should not be any stored context across the servers. And there should be a clear distinction between client and server where the state can be managed at the client end but not on a server. In return, this rule provides options for scalability, security, and also portability across data centers for the servers. The rules and concepts state that the REST API is broken down into a series of modules. For the developers, this level of Modularity provides flexibility. At the same time, it is a challenging feet to develop a REST endpoint from scratch.

An HTTP API protocol sent from a client to a REST endpoint is called a ‘request’ and the server provides the data-based on the REST endpoint model which in return is called a ‘response’. Applications are the ones that consume RESTful APIs, so the response doesn't have to be styled but it does provide pagination. Responses can be XML or JSON depending on the application. In some scenarios we can program the Target REST API endpoint to provide responses in either XML or JSON based on the input headers.


HTTP Methods for REST APIs

REST API’s suggest using a particular HTTP method on an API call from the client to the server. Below are standard HTTP Methods (frequently called as verbs):

●    GET   - Retrieve Resource representational information

●    POST - Create a new sub resource

●    PUT   - Update Existing resource

●    PATCH - Partial update on a resource

●    DELETE - Delete a resource

These methods provide REST clients to perform four possible actions:

CRUD

C         Create

 R        Read

   U      Update

      D   Delete


How do you make API calls using cURL?

Let's take an example of an existing REST API Endpoint JSON Placeholder (A simple HTTP Request & Response Service). JSON Placeholder

In this blog, we will cover GET, POST, PUT, PATCH, DELETE methods by using cURL.

Base URL: https://jsonplaceholder.typicode.com

Methods:

/GET

A simple GET method with media type in header and pagination:

Request:

curl -X GET "https://jsonplaceholder.typicode.com/posts?_page=1&_limit=2" \
-H "Accept: application/json

Response:

[

  {

    "userId": 1,

    "id": 1,

    "title": "sunt aut facere repellat provident occaecati excepturi optio reprehenderit",

    "body": "quia et suscipit\nsuscipit recusandae consequuntur expedita et cum\nreprehenderit molestiae ut ut quas totam\nnostrum rerum est autem sunt rem eveniet architecto"

  },

  {

    "userId": 1,

    "id": 2,

    "title": "qui est esse",

    "body": "est rerum tempore vitae\nsequi sint nihil reprehenderit dolor beatae ea dolores neque\nfugiat blanditiis voluptate porro vel nihil molestiae ut reiciendis\nqui aperiam non debitis possimus qui neque nisi nulla"

  }

]

  1. -X GET: by default, curl considers the request method to be GET unless specified.
  2. -H: Header flag where the Key: accept and Value: application/json which indicates our request is expecting a response in JSON format.
  3. ?_page=1&_limit=2: pagination Page 1 with limit 2

To understand the request and response header and SSL handshakes curl provides a verbose flag:

Request:

curl -X GET "https://jsonplaceholder.typicode.com/posts?_page=1&_limit=2" \

-H "Accept: application/json" -v

Response:

Note: Unnecessary use of -X or --request, GET is already inferred.

*   Trying 2606:4700:e6::ac40:c424...

* TCP_NODELAY set

* Connected to jsonplaceholder.typicode.com (2606:4700:e6::ac40:c424) port 443 (#0)

* ALPN, offering h2

* ALPN, offering http/1.1

* successfully set certificate verify locations:

*   CAfile: /etc/ssl/cert.pem

  CApath: none

* TLSv1.2 (OUT), TLS handshake, Client hello (1):

* TLSv1.2 (IN), TLS handshake, Server hello (2):

* TLSv1.2 (IN), TLS handshake, Certificate (11):

* TLSv1.2 (IN), TLS handshake, Server key exchange (12):

* TLSv1.2 (IN), TLS handshake, Server finished (14):

* TLSv1.2 (OUT), TLS handshake, Client key exchange (16):

* TLSv1.2 (OUT), TLS change cipher, Change cipher spec (1):

* TLSv1.2 (OUT), TLS handshake, Finished (20):

* TLSv1.2 (IN), TLS change cipher, Change cipher spec (1):

* TLSv1.2 (IN), TLS handshake, Finished (20):

* SSL connection using TLSv1.2 / ECDHE-ECDSA-CHACHA20-POLY1305

* ALPN, server accepted to use h2

* Server certificate:

*  subject: C=US; ST=CA; L=San Francisco; O=Cloudflare, Inc.; CN=sni.cloudflaressl.com

*  start date: Jul 29 00:00:00 2020 GMT

*  expire date: Jul 29 12:00:00 2021 GMT

*  subjectAltName: host "jsonplaceholder.typicode.com" matched cert's "*.typicode.com"

*  issuer: C=US; O=Cloudflare, Inc.; CN=Cloudflare Inc ECC CA-3

*  SSL certificate verify ok.

* Using HTTP2, server supports multi-use

* Connection state changed (HTTP/2 confirmed)

* Copying HTTP/2 data in stream buffer to connection buffer after upgrade: len=0

* Using Stream ID: 1 (easy handle 0x7fb070010800)

> GET /posts?_page=1&_limit=2 HTTP/2

> Host: jsonplaceholder.typicode.com

> User-Agent: curl/7.64.1

> Accept: application/json

* Connection state changed (MAX_CONCURRENT_STREAMS == 256)!

< HTTP/2 200

< date: Fri, 07 Aug 2020 09:03:46 GMT

< content-type: application/json; charset=utf-8

< content-length: 600

< set-cookie: __cfduid=da9601881d1a1019d595f4e381f680d7e1596791026; expires=Sun, 06-Sep-20 09:03:46 GMT; path=/; domain=.typicode.com; HttpOnly; SameSite=Lax

< x-powered-by: Express

< x-ratelimit-limit: 1000

< x-ratelimit-remaining: 999

< x-ratelimit-reset: 1596790794

< vary: Origin, Accept-Encoding

< access-control-allow-credentials: true

< cache-control: max-age=43200

< pragma: no-cache

< expires: -1

< x-total-count: 100

< access-control-expose-headers: X-Total-Count, Link

< link: <http://jsonplaceholder.typicode.com/posts?_page=1&_limit=2>; rel="first", <http://jsonplaceholder.typicode.com/posts?_page=2&_limit=2>; rel="next", <http://jsonplaceholder.typicode.com/posts?_page=50&_limit=2>; rel="last"

< x-content-type-options: nosniff

< etag: W/"258-/AdFG/pwMUveUGKZ3vuwGAJYftA"

< via: 1.1 vegur

< cf-cache-status: HIT

< age: 290

< accept-ranges: bytes

< cf-request-id: 0469c28a480000f06092b24200000001

< expect-ct: max-age=604800, report-uri="https://report-uri.cloudflare.com/cdn-cgi/beacon/expect-ct"

< server: cloudflare

< cf-ray: 5befd38a0e64f060-EWR

[

  {

    "userId": 1,

    "id": 1,

    "title": "sunt aut facere repellat provident occaecati excepturi optio reprehenderit",

    "body": "quia et suscipit\nsuscipit recusandae consequuntur expedita et cum\nreprehenderit molestiae ut ut quas totam\nnostrum rerum est autem sunt rem eveniet architecto"

  },

  {

    "userId": 1,

    "id": 2,

    "title": "qui est esse",

    "body": "est rerum tempore vitae\nsequi sint nihil reprehenderit dolor beatae ea dolores neque\nfugiat blanditiis voluptate porro vel nihil molestiae ut reiciendis\nqui aperiam non debitis possimus qui neque nisi nulla"

  }

* Connection #0 to host jsonplaceholder.typicode.com left intact

]* Closing connection 0

The above is the detail list of transport layer communication between the client and server

/POST

A simple POST method with media type in header and json request body:

Request:

curl -X POST 'https://jsonplaceholder.typicode.com/posts' \

-H 'Accept: application/json' \

-H 'Content-Type: application/json' -d '{ 

    "userId": 10,

    "title": "Just Infinity",

    "body": "Infinity has no beginning, which has no beginning there is no end"

  }'

Response:

{

  "userId": 10,

  "title": "Just Infinity",

  "body": "Infinity has no beginning, which has no beginning there is no end",

  "id": 101

}

  1. -H 'Accept: application/json’: This header Parameter passing the media type application JSON which indicates the client accepts JSON body as a response
  2. -H 'Content-Type: application/json': This header parameter passing the media type application JSON is indicating the post request the body is in JSON format
  3. -d: indicates the short version of data

As you can see, from the response the POST request had created a new resource with id:101. In case you send a request body the same as the existing resource it would still create a new resource with a new ID as the POST method is not idempotent.

/PUT

A simple PUT method with media type in header and json request body:

Request:

curl -X PUT 'https://jsonplaceholder.typicode.com/posts/10' \

-H 'Accept: application/json' \

-H 'Content-Type: application/json' -d '{

    "userId": 10,

    "title": "Just Infinity",

    "body": "Infinity has no beginning, which has no beginning there is no end"

  }'

Response:

{

  "userId": 10,

  "title": "Just Infinity",

  "body": "Infinity has no beginning, which has no beginning there is no end",

  "id": 10

}

  1. /10 in the URL indicates we are updating the existing resource id:10.

As you can see, PUT is an idempotent, and it would be updating the current existing resource. And in case any JSON objects are missing in your request body it would be lost permanently as the current resource gets updated with the new request body sent.

For example, from the above request body, we eliminate the JSON object “body”.

Then:

Request:

curl -X PUT 'https://jsonplaceholder.typicode.com/posts/10' \

-H 'Accept: application/json' \

-H 'Content-Type: application/json' -d '{     "userId": 10,     "title": "Just Infinity"   }'

Response:

{

  "userId": 10,

  "title": "Just Infinity",

  "id": 10

}

/PATCH

A simple PATCH method with media type in header and json request body:

Request:

curl -X PATCH 'https://jsonplaceholder.typicode.com/posts/10' \

-H 'Accept: application/json' \

-H 'Content-Type: application/json' -d '{

    "title": "Just Infinity"

  }'

Response:

{

  "userId": 1,

  "id": 10,

  "title": "Just Infinity",

  "body": "quo et expedita modi cum officia vel magni\ndoloribus qui repudiandae\nvero nisi sit\nquos veniam quod sed accusamus veritatis error"

}

As you can see, PATCH does not need the whole body to be sent as part of the request. One can limit that to the single JSON object. And only the parameter that is sent would be updated.

/DELETE

A simple DELETE method with media type in header and json request body:

Request:

curl -X DELETE 'https://jsonplaceholder.typicode.com/posts/10'         

Response:

{}

As you can see, DELETE simply removes the existing resource in our case resource 10 was removed.


Conclusion

To put this in nutshell, cURL is really proving a command-line helper to developers when working with APIs and providing immense support for making requests, connecting with APIs, troubleshooting the issues using verbose, multiple security options to access the APIs securely and many more. I hope this blog can give the basic understanding what is cURL, how to construct a cURL request, get the response and some important flags to troubleshoot while working with APIs.

In the future, will be coming up with another blog “cURL for Apigee API proxy” which will be mainly focused on create, build, deploy proxy on Apigee edge and use cURL to test the proxy passing “Bearer” as Authorization header to support OAuth2 client credentials.